Replication comes first
Structuring python data science projects for replication
Outline
This presentation is about making better replication packages with less effort.
You need to be thinking about replication from the start of each project.
Just recognizing and applying a few patterns to your workflow will make the replication package a byproduct of your analysis rather than a chore that’s left until the end.
Why replication is important.
Why researchers find replication hard.
How to make replication easy.
Replication is not optional
If you want to publish at any top journal or the Bank of Canada website, you will need to prepare a replication package.
Replication should not be optional
Even if you aren’t planning on publishing you should still care.
Our job is not to publish papers, it is to produce scientific knowledge. Replication is part of that.
Replicable workflows will also help future you and future RAs to be more productive.
Replication is the heart of science.
We are empiricists; we shouldn’t trust what we can’t see.
The most likely replicator is you six months from now.
Why the hate?
Most replication packages are not very good.
This is because researcher’s find making them difficult and boring.
It requires programming more like a software engineer than just a data analyst and it can feel unrelated to the actual research.
Replication is hard:
It is harder to get it working on every computer than just your own.
Replication is boring:
It is the last step to publication and you’re probably already bored of the project.
Suggested template
This is the template I use, and yes it is a lot of boilerplate.
For now trust me that everything is there for a reason.
Environment
What you need to run the code or contribute to the code.
Knowledge
What you need to understand the code and results.
Code
The code with all parameters defined in one place.
│ environment.yml # Conda environment used for project
│ LICENSE # Open-source license
│ pyproject.toml # Package metadata and configuration
│ README.md # Brief documentation
├───data
│ ├───interim # Intermediate data that has been transformed
│ ├───processed # The final, canonical datasets
│ └───raw # The original, immutable data dump
├───docs # MkDocs documentation
├───models # Output models and model results
├───reports
│ ├───figures # Output figures
│ └───tables # Output tables
└───src
└───thispackage # Python package
__init__.py # Makes package installable
config.py # Configuration parameters
dataset.py # Clean and output data
plots.py # Generate plots
Environment
Telling the computer how to run your code.
environment.yml
Here is the environment.yml for a simple project.
It specifies the name of the conda environment, the channels to download dependencies from, and the project dependencies.
This makes it easy for anyone to replicate the environment and all dependencies. More detailed dependencies can be exported with conda env export > environment_full.yml at the end of the project.
It also installs the project in development mode
If you’re scared of conda, these are the only commands you need to know.
name : thispackage
channels :
- conda-forge
dependencies :
- python=3.13
- pandas
- plotly
- ruff
- jupyter
- pip
- pip :
- -e .
# To install: conda env create -f environment.yml
# To use: conda activate thispackage
# To update: conda env update -f environment.yml --prune -n thispackage
environment.yml—new dependency
To add a dependency just put it on a line and run conda env update -f environment.yml --prune -n thispackage
name : thispackage
channels :
- conda-forge
dependencies :
- python=3.13
- pandas
- plotly
- statsmodels
- ruff
- jupyter
- pip
- pip :
- -e .
# To install: conda env create -f environment.yml
# To use: conda activate thispackage
# To update: conda env update -f environment.yml --prune -n thispackage
pyproject.toml
[build-system] # Tells pip how to install the package
[project] # Contains project metdata
[tool.ruff]
line-length = 79
[tool.ruff.lint]
extend-select = [
"PTH" , # Suggest pathlib instead of os
"PD" , # Pandas best practices
"D" # Require docstrings
]
[tool.ruff.lint.pydocstyle]
convention = "google"
Documentation
The environment files teach the computer to run the project, but the documentation teaches the humans.
The first challenge is helping the replicator understand what your project is doing. That is what the README does.
Then the docs explain the code in detail, these should be less targeted to a literal replication and more for a researcher modifying or extending the project.
README: Broad overview and replication steps.
MkDocs: Detailed code documentation.
README
READMEs are often too long and a complex README can be a sign of a poorly structured project.
There is nothing wrong with a README that just briefly describes the replication procedure.
Leave the docs to describe the actual implementation details.
A well-structured project can have a simple README.
# This Package
Brief project description.
<!-- Environment and docs boilerplate -->
## Replication procedure
All raw data is included in `./data/raw` .
To replicate project outputs, first collect the dataset by running:
```powershell
python ./src/thispackage/dataset.py
```
Then generate the outputs with:
```powershell
python ./src/thispackage/plots.py
```
MkDocs
I use MkDocs to generate documentation. Each markdown file is converted into a page, the syntax is very simple.
The actual documentation can largely be generated from the code.
Mkdocstrings will automatically convert your docstrings to html documentation.
This expands to all the docstrings from config.py.
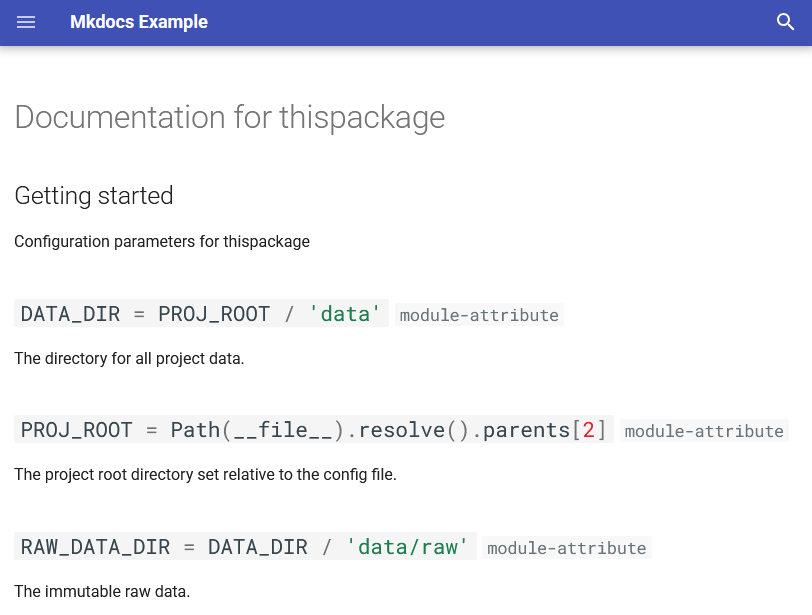
A simple static site generator for documentation.
# Documentation for thispackage
## Getting started
Configuration parameters for thispackage.
::: src.thispackage.config
MkDocs example
This is the rendered version of that mkdocs page.
You can see how mkdocstrings fetched the documentation for these path variables.
Code
Now we need to talk about the actual code of the project.
Luckily, beyond the environment, there are only two rules for replicable code.
Important means anything a replicator would likely want to modify while looking at your project.
Paths should be file-system agnostic.
Important parameters should be defined in config.py.
File system
Hard-coded paths always cause errors in a replication and are easily avoidable. Never use them.
If you fix these paths once, you’ll save every future replicator some time and annoyance.
Did you know variables can have docstrings? This documentation will show up in the MkDocs site.
Use pathlib.Path.
Define each path relative to a common root.
from pathlib import Path
PROJ_ROOT = Path(__file__ ).resolve().parents[2 ]
"""The project root directory set relative to the config file."""
DATA_DIR = PROJ_ROOT / "data"
"""The directory for all project data."""
RAW_DATA_DIR = DATA_DIR / "data/raw"
"""The immutable raw data."""
Using path parameters
This is just a quick example of how to actually use the project path parameters.
Other parameters can be imported from config in the same way.
Very wrong
raw_file = "C:/Users/steh/Projects/thispackage/data/productivity.csv"
Wrong
raw_file = "../data/productivity.csv"
Right
from thispackage.config import RAW_DATA_DIR
raw_file = RAW_DATA_DIR / "productivity.csv"
Using the template
Obviously you don’t have to create all these files each time you start a project.
You can use a package called cookiecutter to quickly start new projects using a template.
The template is available from github .
conda create -n Cookiecutter python=3.13 cookiecutter pre-commit
conda run -n Cookiecutter --no-capture-output `
cookiecutter https://github.com/henrystern/cookiecutter-python-data
Or you can create your own cookiecutter template.
Conclusion
Now you know why each file is in the template, you mostly don’t have to think about them.
Just remember to start your projects with a good template and your replication packages will be more useful for researchers and easier for you to make.
Start your projects knowing you’ll have to make a replication package.
Use a project template to handle the replication boilerplate.
Appendix
I didn’t mention every feature of the template.
Specifically, I glossed over the git configuration.
Git is a fantastic tool that you should use, but it is a bit more of a commitment.
This appendix will quickly cover the files I skipped.
.gitignore
Controls which files are included in the repository.
Datasets should usually be excluded, as should binary outputs.
__pycache__/
/data/**/*.parquet
/data/**/*.csv
.gitkeep
Just an empty text file.
This is useful if you have gitignored output files but need the directory to avoid errors. Without it, empty directories will not be created in the git repo.
For example, this line will fail if networks is not a directory in PROCESSED_DATA_DIR, so you would add a .gitkeep file in the networks directory.
final.to_parquet(PROCESSED_DATA_DIR / "networks/canada.parquet" )
.pre-commit-config.yaml
Configures ruff to lint and format code before each commit.
It will help you maintain quality standards, especially complete documentation.
Requires that pre-commit be installed and that the hooks be initialized with pre-commit install.
The hooks are automatically initialized if you include git while creating the template.
LICENSE
This is an optional open-source license for the project.
It is unnecessary for work projects, but should be included if the code is made public.
Remember that the Bank own’s the copyright to all projects made at work.